Setting up UPS NUT with 3 PCs
September 10, 2025During my summer vacation I was lucky enough to get an UPS from a local recycle station, all it need is a new battery and a new capacitor, with me replaced its battery and a help from a friend to replace one of the capacitor, now the unit is fully working, hooking up with just one PC is quite an easy work, but multiple PC is slightly of a headache, so after spending half of the afternoon finding guides, informations and finally got everything setup, I decided to create this post for myself and someone who might needs it.
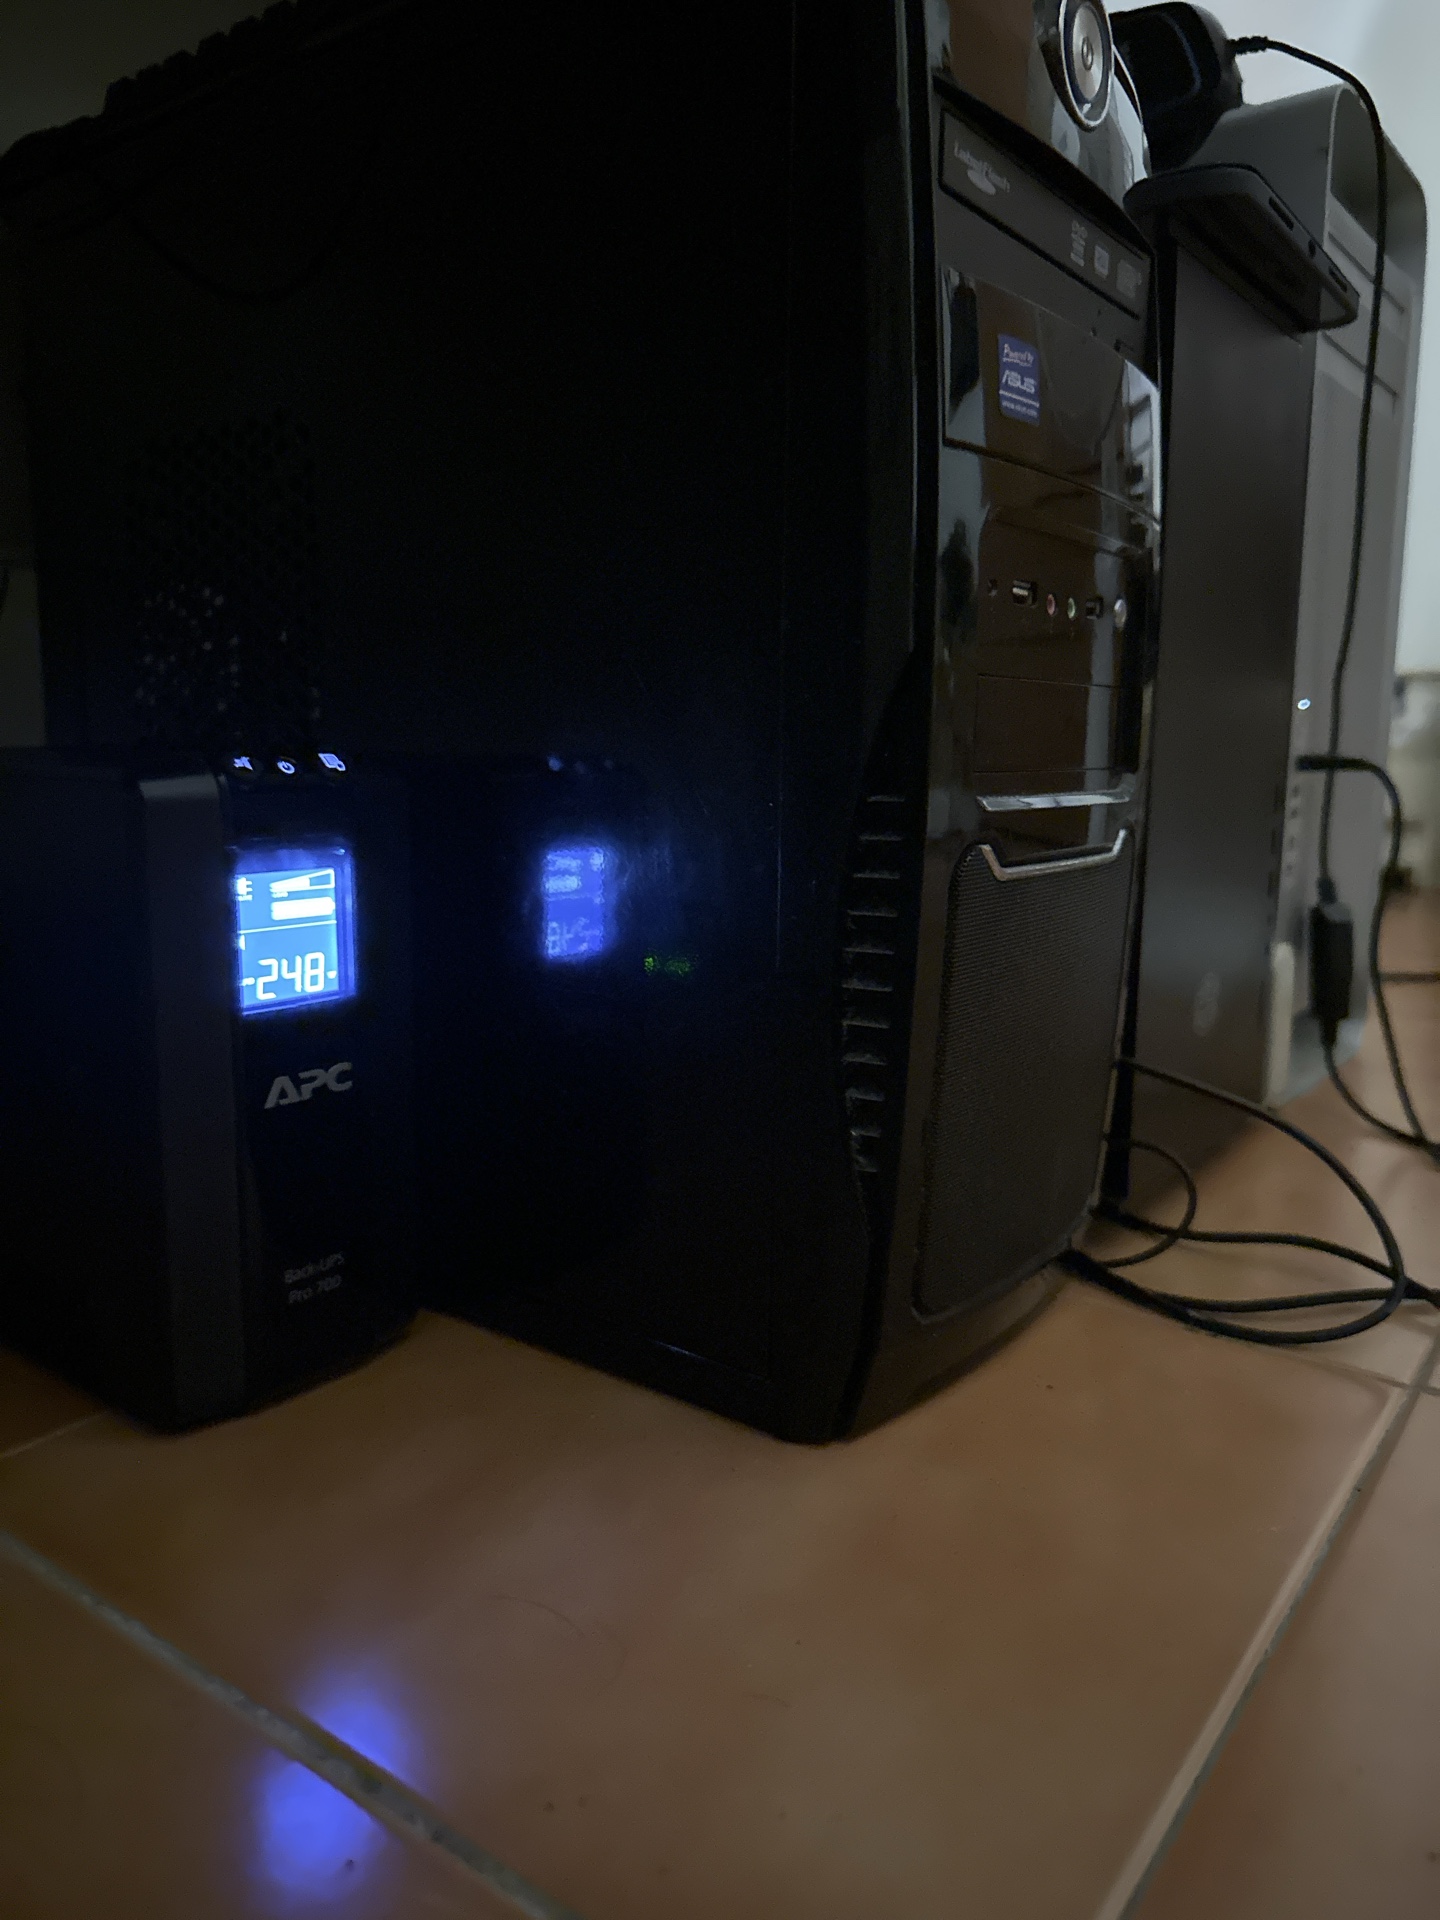
The UPS I got is an APC Back-UPS Pro 700. Line-Interactive UPS, 700VA/420W, 6x Ports (3x battery backup, 3x surge protection), with it hooking up my Mac Pro, TrueNAS and Proxmox PCs it’s usually around 230~300W in normal circumstances and around 80W when my Mac Pro is in sleep, although I haven’t put it under heavy load to see how much it can pull yet but should be enough to supply.
UPS Placement + Close Up:

Hardware Setup
My UPS got 3x battery backup ports, I’ve plugged Mac Pro, Proxmox and TrueNAS PC into it and have the UPS USB plugged directly into Proxmox PC as master and other two as slave.
I did originally consider using my recently acquired Raspberry Pi 3B as a master device but decided not to because I’ve never played with a Raspberry Pi before since I won’t have it hooked up to UPS so it’s kinda useless to do…unless I either give up Mac Pro or have the Pi connected to one of the PC to supply power.
Software Setup
As stated above, I will have my Proxmox PC as master, so that’s where the NUT server will be configured, let’s get started!
NUT Master PC Setup
Firstly, we need to make sure UPS is connected and recongized by PC, so in the terminal, type lsusb to list all the connected USB devices.
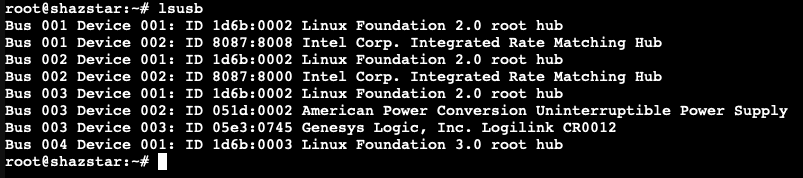 You can see on Bus 003 Device 002 is where my UPS connected to, take note of that.
Important Notes: Because I already have root privileges on Proxmox, so there’s no need to use sudo, but depending on which system you are using, you might need to use sudo.
Update repo with apt update then install nut, nut-client and nut-server with this command: apt install nut nut-client nut-server
Use nut-scanner -U to probe UPS devices and get information from it, also take note of it.
We need to configure these files: ups.conf, upsmon.conf, upsd.conf, nut.conf and upsd.users.
The example file have a lot of stuffs inside so I ended up backing up these files and remake new files to start fresh.
You can do cp /etc/nut/ups.conf /etc/nut/ups.example.conf to copy a backup of the file and wipe out the original one, or do mv /etc/nut/ups.conf /etc/nut/ups.example.conf to rename it then remake new one, replace ups.conf to one you are going to edit, now let’s get started to edit those file with nano: nano /etc/nut/ups.conf. Here’s my config.
ups.conf:
pollinterval = 1 maxretry = 3
[ups] driver = usbhid-ups port = auto desc = “APC Back-UPS Pro 700” vendorid = 051D productid = 0002 serial = 3xxxxxxxxxxx
upsmon.conf:
MONITOR ups@localhost 1 upsmon secret master
upsd.conf:
LISTEN 0.0.0.0 3493
nut.conf:
MODE=netserver
upsd.users:
[monuser] password = secret upsmon master
After finished up editing this file, reboot PC.
After finished rebooting, you can check the connection with this command: upsc ups@localhost
And you will see this: 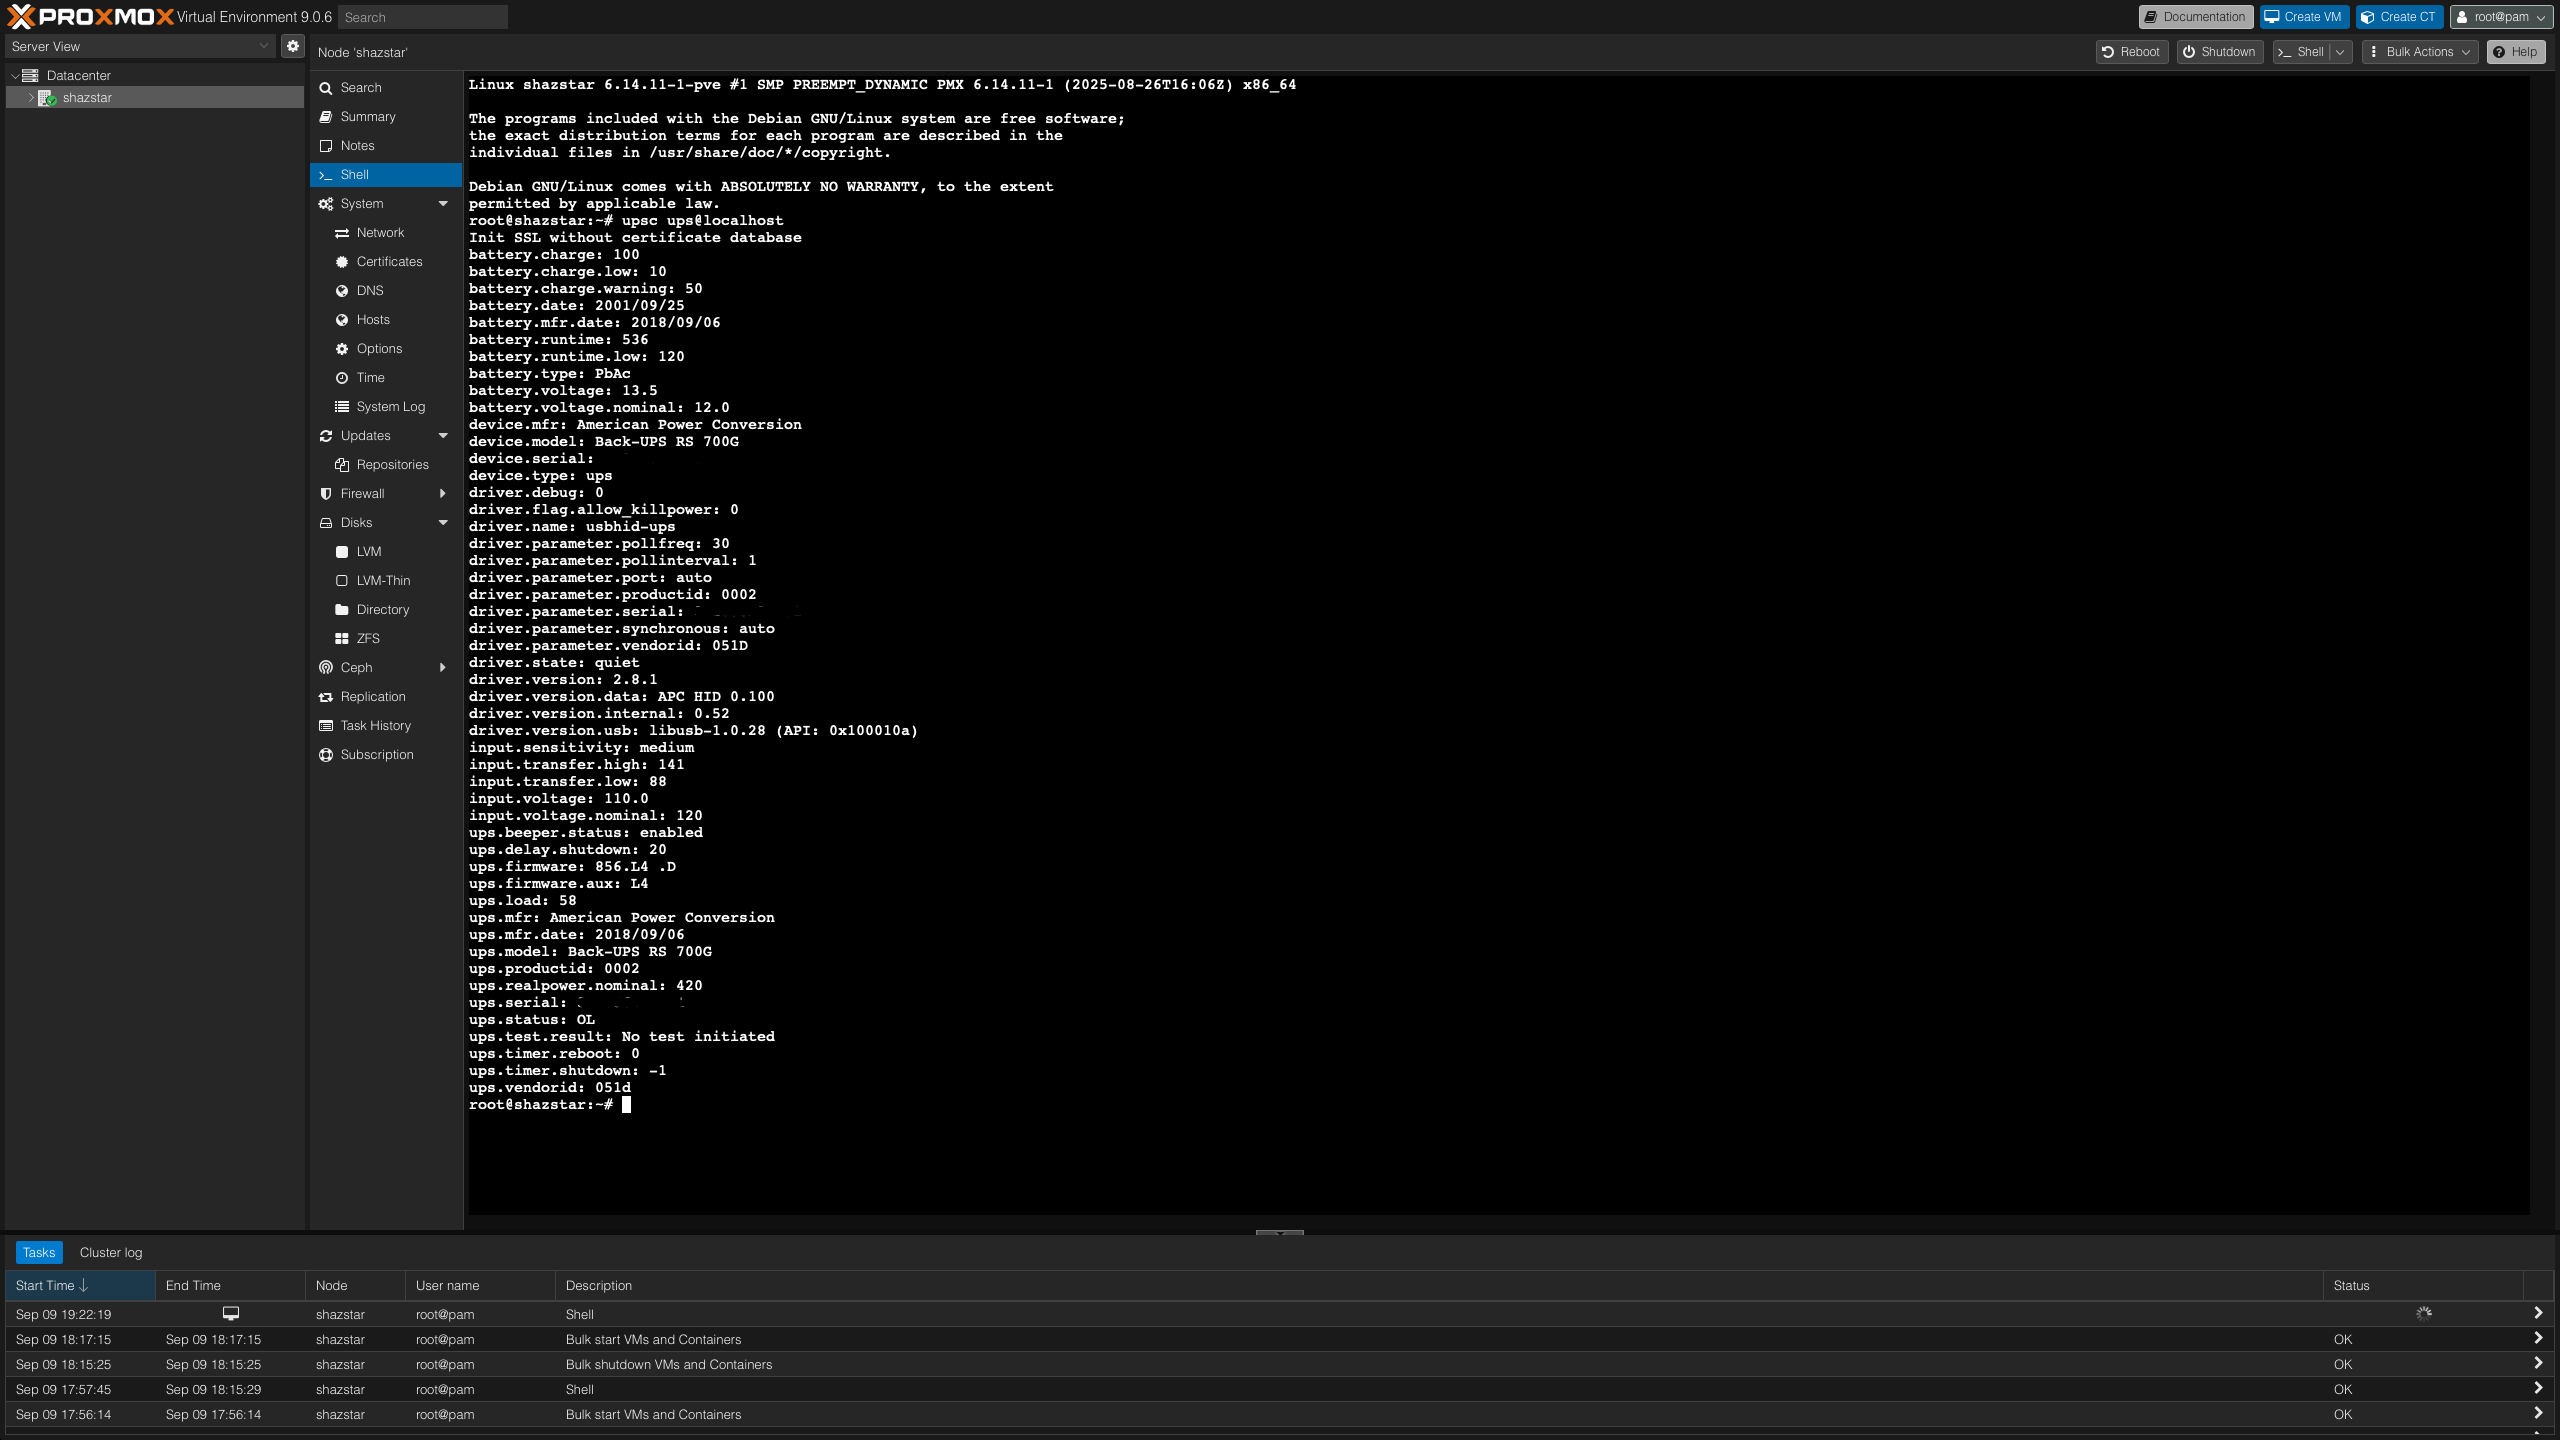
This means your configure file are successful and NUT is able to connect to your UPS.
NUT CGI Setup
CLI reporting is cool but it’ll be better if you can just view the info via web dashboard right? That’s where nut-cgi comes in.
You’ll need to install apache2 and nut-cgi with apt install apache2 nut-cgi
After installing you need to configure hosts.conf files -> nano /etc/nut/hosts.conf. As usual I backup the original file and make a new one.
hosts.conf:
MONITOR ups@localhost “APC Back-UPS Pro 700”
Then do a2enmod cgi to activate the module and systemctl restart apache2 to restart apache2.
You’ll also have to edit upsset.conf files -> nano /etc/nut/upsset.conf
upsset.conf:
I_HAVE_SECURED_MY_CGI_DIRECTORY
You should be able to check the dashboard by going to here: http://192.168.x.x/cgi-bin/nut/upsstats.cgi, replace x.x with the ip of your master PC.

Client PC Setup
Time to move onto client PC setup, this will cover TrueNAS Scale, macOS, Linux and Windows.
TrueNAS Scale
This is pretty easy and straightforward to setup actually, all you need is go to System Settings -> Services and setup UPS in there, here’s my settings, everything is pretty self explanatory: 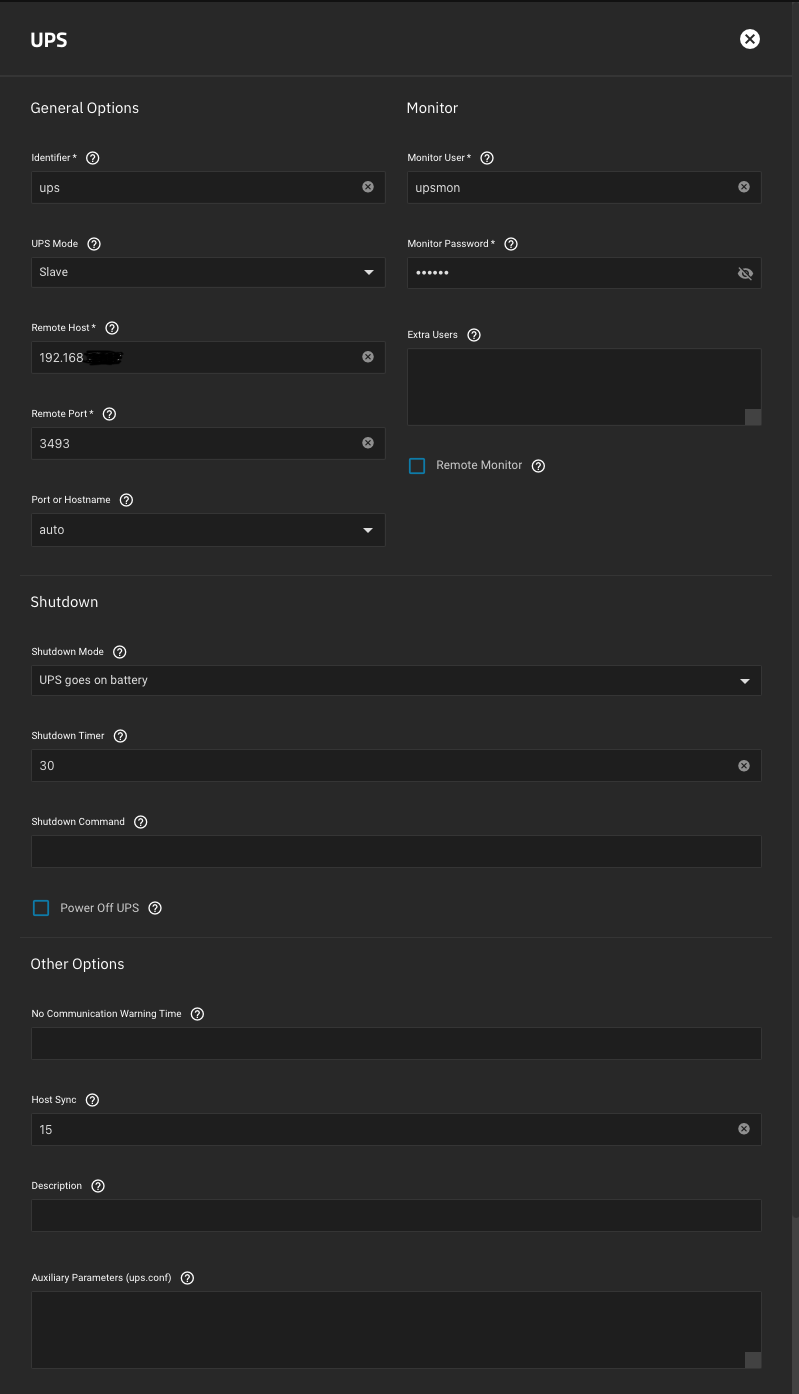
After finish setting up, start the service and enable automatically start.
To verify, go to Settings -> Shell and do the same upsc command, but this time replace localhost to the IP address of your master PC: upsc ups@192.168.x.x
If successfull you will see your UPS info: 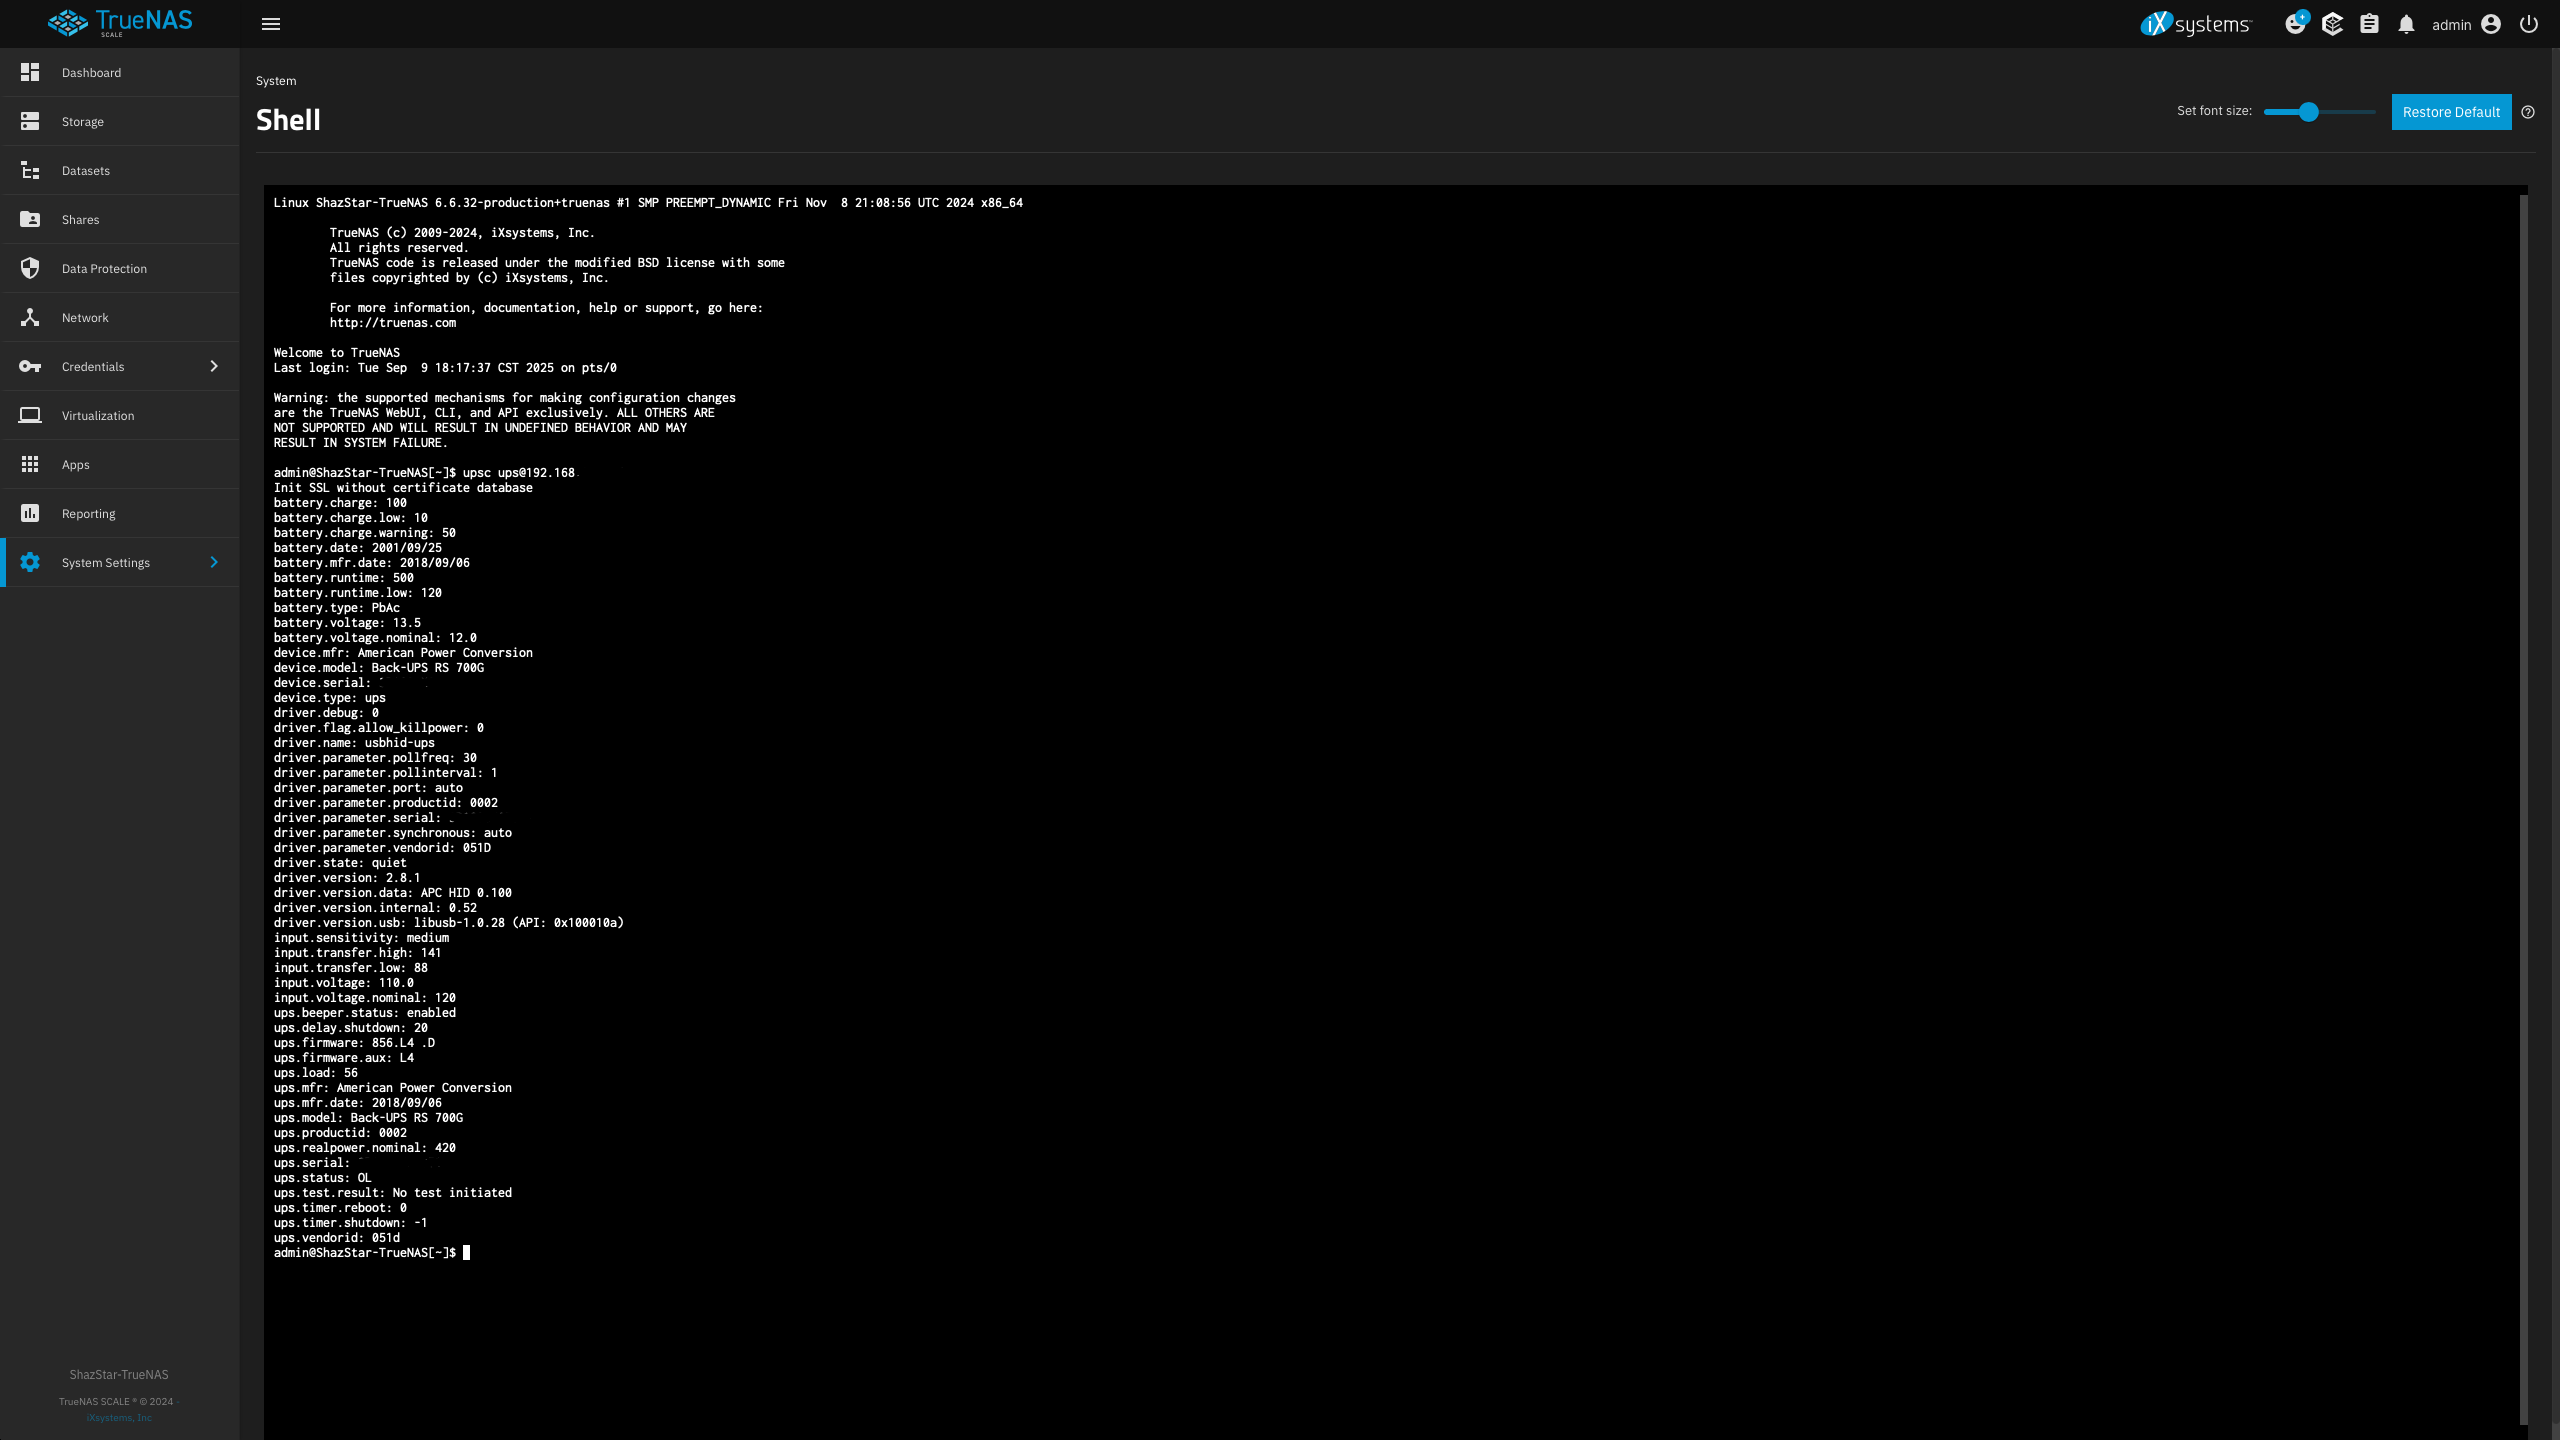
Linux
I personally don’t have a Linux system hooked up to TrueNAS (Not counting TrueNAS & Proxmox), but I’ll also include this here for someone who needs it, this may vary from what distro you used, I’ll write one for Arch since that’s what I used.
Install NUT via pacman -> sudo pacman -Syu nut
After that you have to configure 3 files: nut.conf, upsmon.conf and upssched.conf.
nut.conf:
MODE=netclient
upsmon.conf:
RUN_AS_USER root
MONITOR ups@192.168.22.117 1 upsmon secret slave
MINSUPPLIES 1 SHUTDOWNCMD “/sbin/shutdown -h” NOTIFYCMD /usr/sbin/upssched POLLFREQ 2 POLLFREQALERT 1 HOSTSYNC 15 DEADTIME 15 POWERDOWNFLAG /etc/killpower
NOTIFYMSG ONLINE “UPS %s on line power” NOTIFYMSG ONBATT “UPS %s on battery” NOTIFYMSG LOWBATT “UPS %s battery is low” NOTIFYMSG FSD “UPS %s: forced shutdown in progress” NOTIFYMSG COMMOK “Communications with UPS %s established” NOTIFYMSG COMMBAD “Communications with UPS %s lost” NOTIFYMSG SHUTDOWN “Auto logout and shutdown proceeding” NOTIFYMSG REPLBATT “UPS %s battery needs to be replaced” NOTIFYMSG NOCOMM “UPS %s is unavailable” NOTIFYMSG NOPARENT “upsmon parent process died - shutdown impossible”
NOTIFYFLAG ONLINE SYSLOG+WALL+EXEC NOTIFYFLAG ONBATT SYSLOG+WALL+EXEC NOTIFYFLAG LOWBATT SYSLOG+WALL NOTIFYFLAG FSD SYSLOG+WALL+EXEC NOTIFYFLAG COMMOK SYSLOG+WALL+EXEC NOTIFYFLAG COMMBAD SYSLOG+WALL+EXEC NOTIFYFLAG SHUTDOWN SYSLOG+WALL+EXEC NOTIFYFLAG REPLBATT SYSLOG+WALL NOTIFYFLAG NOCOMM SYSLOG+WALL+EXEC NOTIFYFLAG NOPARENT SYSLOG+WALL
RBWARNTIME 43200
NOCOMMWARNTIME 600
FINALDELAY 5
upssched.conf:
CMDSCRIPT /etc/nut/upssched-cmd PIPEFN /etc/nut/upssched/upssched.pipe LOCKFN /etc/nut/upssched/upssched.lock
AT ONBATT * START-TIMER onbatt 30 AT ONLINE * CANCEL-TIMER onbatt online AT ONBATT * START-TIMER earlyshutdown 30 AT LOWBATT * EXECUTE onbatt AT COMMBAD * START-TIMER commbad 30 AT COMMOK * CANCEL-TIMER commbad commok AT NOCOMM * EXECUTE commbad AT SHUTDOWN * EXECUTE powerdown AT SHUTDOWN * EXECUTE powerdown
After everything is configured, you can restart nut services with sudo systemctl restart nut.
To verify: upsc ups@192.168.x.x
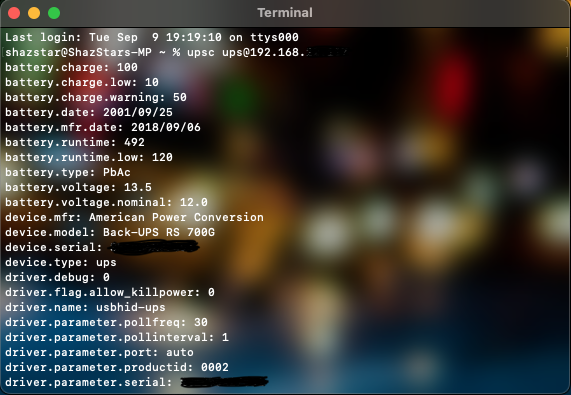
macOS
This is a bit tricky but not as hard, all you need to remember is since NUT is installed via homebrew, the location of it are slightly different than its Linux counterpart, normally the NUT location will be inside /etc/nut/, but on macOS its in /usr/local/Cellar and its config file is stored in /usr/local/etc/nut.
Install NUT via homebrew -> brew install nut
After that you have to configure 3 files: nut.conf, upsmon.conf and upssched.conf.
nut.conf:
MODE=netclient
upsmon.conf:
RUN_AS_USER root
MONITOR ups@192.168.22.117 1 upsmon secret slave
MINSUPPLIES 1 SHUTDOWNCMD “/sbin/shutdown -h” NOTIFYCMD /usr/sbin/upssched POLLFREQ 2 POLLFREQALERT 1 HOSTSYNC 15 DEADTIME 15 POWERDOWNFLAG /etc/killpower
NOTIFYMSG ONLINE “UPS %s on line power” NOTIFYMSG ONBATT “UPS %s on battery” NOTIFYMSG LOWBATT “UPS %s battery is low” NOTIFYMSG FSD “UPS %s: forced shutdown in progress” NOTIFYMSG COMMOK “Communications with UPS %s established” NOTIFYMSG COMMBAD “Communications with UPS %s lost” NOTIFYMSG SHUTDOWN “Auto logout and shutdown proceeding” NOTIFYMSG REPLBATT “UPS %s battery needs to be replaced” NOTIFYMSG NOCOMM “UPS %s is unavailable” NOTIFYMSG NOPARENT “upsmon parent process died - shutdown impossible”
NOTIFYFLAG ONLINE SYSLOG+WALL+EXEC NOTIFYFLAG ONBATT SYSLOG+WALL+EXEC NOTIFYFLAG LOWBATT SYSLOG+WALL NOTIFYFLAG FSD SYSLOG+WALL+EXEC NOTIFYFLAG COMMOK SYSLOG+WALL+EXEC NOTIFYFLAG COMMBAD SYSLOG+WALL+EXEC NOTIFYFLAG SHUTDOWN SYSLOG+WALL+EXEC NOTIFYFLAG REPLBATT SYSLOG+WALL NOTIFYFLAG NOCOMM SYSLOG+WALL+EXEC NOTIFYFLAG NOPARENT SYSLOG+WALL
RBWARNTIME 43200
NOCOMMWARNTIME 600
FINALDELAY 5
upssched.conf:
CMDSCRIPT /usr/local/Cellar/nut/2.8.4/bin/upssched-cmd PIPEFN usr/local/etc/nut/upssched/upssched.pipe LOCKFN usr/local/etc/nut/upssched/upssched.lock
AT ONBATT * START-TIMER onbatt 30 AT ONLINE * CANCEL-TIMER onbatt online AT ONBATT * START-TIMER earlyshutdown 30 AT LOWBATT * EXECUTE onbatt AT COMMBAD * START-TIMER commbad 30 AT COMMOK * CANCEL-TIMER commbad commok AT NOCOMM * EXECUTE commbad AT SHUTDOWN * EXECUTE powerdown AT SHUTDOWN * EXECUTE powerdown
After everything is configured, do brew services start nut to start nut services.
And you can verify with the same command: upsc ups@192.168.x.x
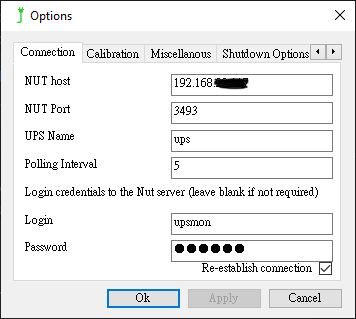
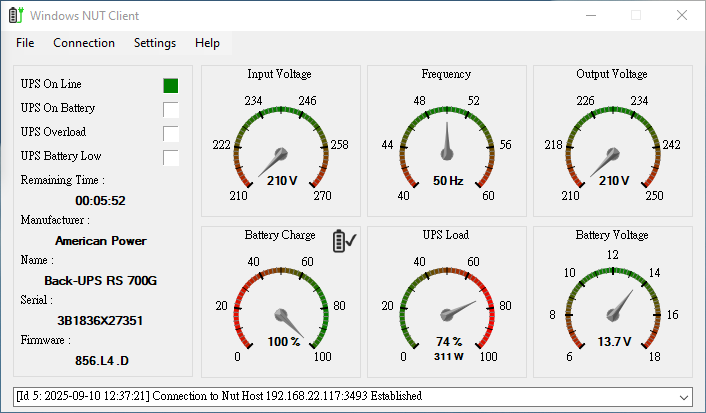
Windows
Windows is also pretty straightforward process, you just need to download WinNUT Client and configure it, I won’t go too much into detail since it’s a GUI app and everything should be pretty self explanatory.
WinNUT Setup:
WinNUT Client:
Useful Links
The Guide I used:
Techno Tim’s Ultimate NUT Server Guide Video and his blog post